Imagine a world where a delicious, homemade meal is always just minutes away, no matter how hectic your schedule. That world is made possible with homemade freezer burritos! Whether you crave the comforting simplicity of bean and cheese or the robust flavors of a beefy delight, whipping up a batch of these culinary treasures for your freezer is a game-changer. Forget expensive, often unhealthy convenience foods; these customizable, budget-friendly burritos offer the ultimate solution for quick lunches, easy dinners, or satisfying on-the-go meals. And for an extra touch of authenticity and freshness, consider crafting your own homemade flour tortillas to encase your delicious fillings.
Why Homemade Freezer Burritos Are Your New Meal Prep Hero
In our fast-paced lives, finding time for wholesome, home-cooked meals can feel like a luxury. This is precisely where the magic of homemade freezer burritos shines. They bridge the gap between wanting healthy, delicious food and needing something fast.
- Unbeatable Convenience: Picture this: no leftovers in the fridge, a hungry family, and zero desire to cook. A few minutes in the microwave or toaster oven, and you have a warm, satisfying meal. This makes them perfect for busy weeknights, grab-and-go lunches for work or school, or even a quick snack.
- Significant Cost Savings: Store-bought frozen burritos and fast-food options add up quickly. By preparing your own, especially if you source ingredients strategically (think bulk purchases or sales like those at Aldi mentioned in our inspiration), you can drastically cut your food budget. Some estimations place homemade versions at just $.55 per burrito, a fraction of the cost of their commercial counterparts.
- Healthier Choices: When you make it yourself, you control every ingredient. This means less sodium, fewer unhealthy fats, and no mysterious additives or preservatives found in many pre-packaged meals. You can load them with fresh vegetables, lean proteins, and whole grains, tailoring them precisely to your family's dietary needs and preferences.
- Ultimate Customization: This is where the fun begins! Whether you're a fan of classic bean cheese burritos, a hearty beef tacos-inspired filling, or a combination, the possibilities are endless. Adjust the spice level, add your favorite vegetables, or experiment with different cheese blends. This adaptability ensures that everyone gets exactly what they love.
Crafting Your Perfect Filling: Bean & Cheese or Beefy Delights
The heart of any great burrito lies in its filling. Here, we explore two beloved variations, offering tips to make each one truly exceptional.
The Classic: Irresistible Bean & Cheese Burritos
Simple, comforting, and incredibly cost-effective, the bean and cheese burrito is a timeless favorite. The beauty of this recipe lies in its minimal ingredients and quick preparation, making it perfect for efficient meal prepping.
To create a robust bean and cheese filling, start by combining cooked refried beans (homemade or quality canned), a generous amount of shredded cheddar and Monterey Jack cheese, and a can of Rotel diced tomatoes and green chilies. Simmer this mixture over low heat until the cheese is melted and everything is well combined and warmed through. For a thicker consistency, consider draining the Rotel before adding it to the pot.
Tips for elevating your bean & cheese experience:
- Bean Variety: While refried beans are traditional, experiment with black beans or pinto beans (mashed or whole) for different textures and flavors.
- Cheese Blend: Beyond cheddar and jack, try a Mexican blend, pepper jack for a kick, or even a smoked gouda for an unexpected twist.
- Spice It Up: Enhance the flavor with a dash of chili powder, cumin, smoked paprika, or a pinch of cayenne pepper. Finely diced jalapeños (fresh or pickled) can add a delightful zing.
- Add-ins: A spoonful of cooked corn, a sprinkle of fresh cilantro, or a touch of onion powder can deepen the flavor profile.
These bean and cheese marvels are truly the essence of Budget-Friendly Bean & Cheese Burritos for Quick Meals, proving that delicious and nutritious doesn't have to break the bank.
Hearty & Flavorful: Beefy Burritos
For those craving a more substantial meal, beefy burritos deliver a rich, savory experience. The inspiration often comes from repurposing leftovers, like perfectly seasoned cast iron steak or the savory meat from your favorite beef tacos, transforming them into a whole new delight.
A fantastic beef filling can start with seasoned ground beef or leftover steak. If using steak, simmer it with diced onions, garlic, and bell peppers in a mild red taco sauce until tender and infused with flavor. For ground beef, brown it thoroughly, drain any excess fat, and then season it with your favorite taco seasoning blend. Incorporating fluffy rice into your beef filling, as suggested by some recipes, adds bulk and a pleasing texture.
Enhancing your beefy burrito filling:
- Flavor layering: Don't underestimate the power of aromatics. Onions, garlic, and bell peppers are fundamental to building a complex flavor base.
- Sauce matters: A good red taco sauce or enchilada sauce will bring all the flavors together. You can even make your own for a truly bespoke taste.
- Cheese Selection: A blend of sharp cheddar and creamy mozzarella melts beautifully, creating that irresistible gooey center.
- Vegetable Boost: Beyond the base aromatics, consider adding cooked corn, black beans, or even some finely chopped zucchini to boost nutrition and texture.
These hearty creations are excellent for meal prep and can be enjoyed fresh or baked for a crispy finish, making them perfect as Cheesy Beef & Bean Burritos: Baked, Easy, and Freezer-Ready.
The Ultimate Combo: Beef and Bean Burritos
Why choose when you can have both? Combining seasoned beef with creamy refried beans creates a dynamic duo of texture and taste. This approach, often inspired by resourceful cooks utilizing leftovers, ensures every bite is packed with savory goodness. Simmer the beef with its aromatics and sauce, then fold in the refried beans along with plenty of cheese. This harmonious blend offers the best of both worlds: the hearty satisfaction of beef and the comforting creaminess of beans.
Assembling and Freezing for Future Feasts
The magic of freezer burritos truly comes alive in the assembly and storage process. Proper technique ensures your burritos stay fresh, flavorful, and free from freezer burn.
- Tortilla Choice: Opt for medium or "burrito size" flour tortillas for a substantial meal. If you're aiming for smaller, more snack-like portions or want to further cut costs, "taco size" tortillas work well. For the ultimate fresh experience, consider making your own homemade flour tortillas – they're surprisingly easy and add an unparalleled texture and flavor to your burritos.
- Portioning the Filling: Place approximately ½ cup of your prepared, slightly cooled filling onto the center of each tortilla. Avoid overfilling, as this can make folding difficult and lead to leaks.
- The Art of the Fold:
- Fold the bottom edge of the tortilla up over the filling.
- Fold in the left and right sides tightly.
- Roll the burrito up from the bottom, ensuring it's snug and secure.
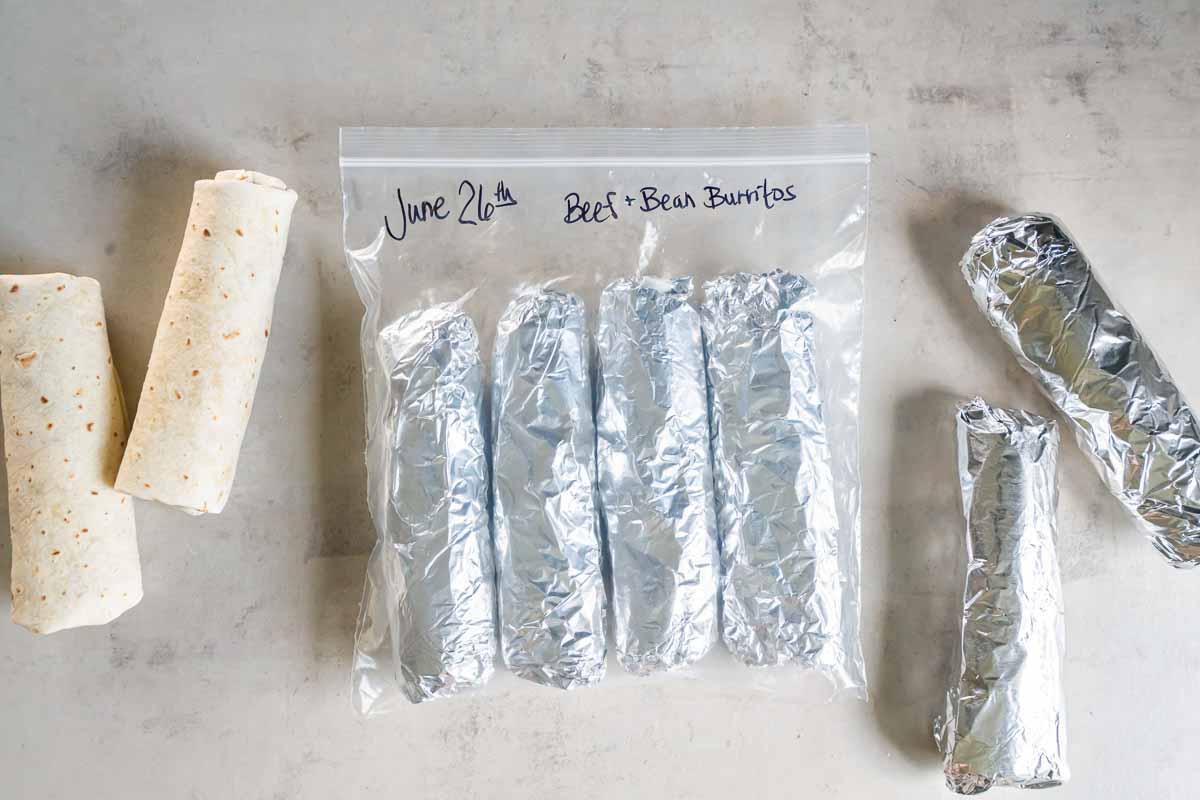
- Wrapping for the Freezer: Immediately after folding, individually wrap each burrito tightly in aluminum foil. This acts as a protective barrier against freezer burn and helps maintain shape.
- Storage: Place the foil-wrapped burritos into labeled gallon-sized freezer bags. Label with the type of filling (e.g., "Bean & Cheese," "Beefy") and the date. Burritos will last deliciously in the freezer for up to 3 months.
- Microwave Method (Quickest): Remove the foil. Place the frozen burrito on a microwave-safe plate. Heat for 2-3 minutes, or until warmed through and the cheese is melty. Cooking time may vary depending on your microwave's wattage and the burrito's size.
- Toaster Oven/Conventional Oven Method (Crispier): Preheat your oven or toaster oven to 350°F (175°C). Remove the foil. Place the frozen burrito directly on a baking sheet. Bake for 15-25 minutes, or until thoroughly heated and slightly crispy on the outside. For an extra touch, brush the top with a little butter and sprinkle with more cheese before baking, as inspired by traditional baked burritos.
Reheating Your Homemade Burritos: Quick & Delicious
The final step to enjoying your meal prep efforts is quick and efficient reheating. Whether you prefer the speed of a microwave or the crispy texture of an oven, your homemade burrito is just minutes away from being a delicious reality.
Serve your reheated burritos with your favorite fresh toppings: a dollop of sour cream, a spoonful of vibrant pico de gallo, fresh cilantro, sliced avocado, extra salsa, or a dash of hot sauce. These accompaniments elevate the experience, turning a simple freezer meal into a gourmet delight.
Embracing homemade freezer burritos, whether you opt for simple bean cheese burritos or hearty beefy options, is a smart move for any busy household. They offer a powerful combination of convenience, health benefits, and incredible cost savings, all while allowing for endless customization. So, stock your freezer, free up your time, and savor the satisfaction of knowing a delicious, wholesome meal is always within reach.
